Information and unique products for Dogs, Cats, Rabbits and Backyard Chickens

Thursday, October 30, 2014

The Pros and Cons of a Fence-Free Flock

There is no shortage of information out there on the internet about keeping backyard chickens, ducks, and other poultry for your household to enjoy for eggs and other benefits. Many websites offer places to purchase or even instructions to build your own coops, fences, and even mobile hen cages to keep your birds in one place, but what about keeping them fence-free?
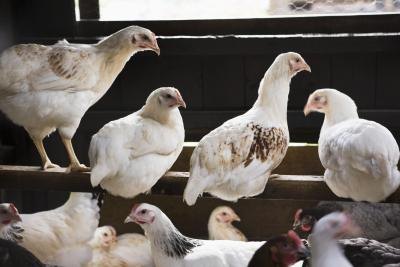
Our flock is free to roam the yard – an option that has shown to have both benefits and a few setbacks. Considering these may help you decide whether to give your own flock the same level of freedom, or to keep them confined for their own safety.

The Pros

  • One commonly known perk of keeping a small backyard flock is that they’ll help keep the bug levels down in your yard. This benefit only grows with the amount of ground that your birds are allowed to cover. My own flock tends to wander toward the wooded areas of the property during the day, both for protection and to eat the insects there. This is great for those of us who live in areas that are plagued by mosquitos in the summer.

Free Range Chicken Image
Free Range Chicken Feed: Bugs and Weeds

  • Chickens and other backyard fowl who are free to roam and eat insects all day require less feed than those with more limited space. Our flock’s diet is probably at least 75% grass and insects during the warmer months, with chicken feed serving as supplemental to their overall diet. This in turn means richer flavored, more nutritious eggs from your hens.
  •  
  • If you have more than three or four laying hens, a fence-free flock can help to keep the peace between your chickens, roosters, and any other types of fowl you keep. Larger and especially multi-species flocks can lead to more frequent disputes and fights between your birds. Our own flock has about twenty birds in total, and it’s very common for us to witness a few scuffles when everyone is gathered in the same spot for food, roosting, or to get out of the rain. During the day, however, they scatter into fluid groups that wander around different areas of the yard, and a relative peace is kept. This is also great for those of us who raise chicks now and then, because jealous roosters or even other hens may peck at and even kill younger chicks.
The Cons

Fox and Hen facing off.
Natural Enemies

  • The most obvious reason for fencing in your flock is to protect them from predators. Raccoons, possums, dogs, and birds of prey such as owls and hawks are just a few common predators that may want their own chicken dinner. We’ve lost more than a handful of chicks and smaller birds over the years. Fences and covered areas can deter these predators and keep your flock safe and happy.
  •  
  • If you like hunting eggs down every few days, then a fence-free flock is for you. Many birds will lay their eggs in the same nest for protection purposes, so it’s common to find eggs from several different hens in the same spot. After a few days of their latest laying spot being emptied, however, the hens will move on and look for a new place to build a nest. If you have a larger yard or one with a lot of nooks and crannies, your daily routine might include a daily egg hunt. Occasionally I’ve found large nests hidden away, and have been forced to toss any eggs I find there simply because I don’t know how old they are. One way to deter this is to use a wooden or plastic decoy egg. Placing one in an existing nest will encourage your ladies to lay their eggs in the same spot. You can also encourage your hens to lay eggs where you want them to by keeping them cooped up in a smaller area for a few days. Once they’re used to laying eggs in one area, they’re more likely to continue. Try combining this method with a couple of decoy eggs for the best results.
  •  
  • Other dangers and risks your flock may face without a fence include traffic on busy streets or highways, or the fact that your birds may just wander off, exposing them to predators and other dangers. If you think these are likely, keeping your flock in an enclosed area is probably the better option.

 Consider the size of your own flock, your yard, and whatever predators may be within range to cause trouble.
Whether or not you decide to keep your backyard flock behind a fence has plenty of benefits and problems, no matter your decision, but taking all of your factors into consideration can help you determine the best option for you. Consider the size of your own flock, your yard, and whatever predators may be within range to cause trouble.

on . 

http://www.fowlblog.com/2014/10/the-pros-and-cons-of-a-fence-free-flock/?utm_source=Copy+of+Why+Aren%27t+They+Laying%3F&utm_campaign=Pros+and+Cons+of+a+Fence+Free+Flock&utm_medium=email

..


..

The Easy Step Bed Stair For Dogs

The Easy Step Bed Stair was designed specifically for smaller pets up to 75 lbs.  


Its deep steps give your pet the ability to get their entire body on each platform and a shorter step height makes climbing the stairs easier for pint-sized pets. 

The new space-saving design allows the stairs to wrap snuggly around furniture taking up less room in your home. 

These stairs feature a hinged back panel that lifts up for easy access to storage space underneath the stairs. 

Carpet treads remove easily and are machine washable. 

Setup is literally “a snap” as the stair easily snaps together (no tools required).

  • "L" Shaped stair layout take up less space in room
  • Rubber grippers on bottom keep stairs secure and in place
  • Hinged back panel for access to storage space
  • Snaps together very easily (no tools required)
  • Low step height (5”) and deep stair landings 25.5” high
  • For small to medium pets only


Capacity 75 lbs

31"L x 14"W x 25.5"H 


$257.15 ea With Free Shipping to locations within the Continental USA.

Save 20% ( $51.43 ) through Nov. 25, 2014


..

Tuesday, October 28, 2014

6 Pests That Can Wreak Havoc On Your Coop

Banish These 6 Coop Pests from Your Coop—Naturally! Photo courtesy Catherine L. Walters/iStock/Thinkstock (HobbyFarms.com)
Courtesy Catherine L. Walters/iStock/Thinkstock

6 Pests That Can Wreak Havoc On Your Coop (And How to Banish Them Naturally!)

Watch carefully for signs that mites, ticks and other nuisances are at work in the coop, and take immediate action to get rid of them for good.


By Audrey Pavia

Although your chickens may be the darlings of your farm, once a pest invasion strikes the coop, nurturing them back to health can be a headache. Chickens are keen at hiding signs of weakness, so you might not notice right away if they’re being attacked by biting lice, mites or flies. It’s important to take careful notice of signs that these poultry pests are at work and take measures to keep them and other chicken threats out of the coop. Here are six of the most common coop pests and natural ways to keep them at bay.


1. Ticks
A species of bloodsucking anthropod, Argas persicus, commonly known as the poultry tick or fowl tick, can discretely feed on your chickens. You’ll likely discover these pests by taking a close look at your coop—ticks hide in the crevices of the coop structure and crawl out at night to feed. Although it’s difficult to see ticks on your chickens, you’ll get a clue to the presence of these arachnids when you notice your chickens are reluctant to go inside the coop at night and seem agitated when they try to roost.
Treatment: To minimize the risk of ticks in the coop, caulk the crevices, which is where ticks hide and breed. If ticks have already taken up residence, use a knife to scrape out the ticks from every crevice and hose out the entire coop. Once the coop is dry, you can then fill all crevices with caulk.


2. Mites & Lice
Northern fowl mites (Ornithonyssus sylviarum) and chicken mites (Dermanyssus gallinae) can infest chicken coops, making your birds’ lives miserable. Like poultry ticks, they hide in dark coop crevices during the day and come out to feast on the blood of the chickens at night. They can cause chickens to stop laying eggs and to scratch and over-preen. You can see these tiny insects crawling around if you examine your chickens at night while they’re roosting.
Treatment: If your coop has been infested with mites or lice, scrub out the coop with a 3-to-1 water-to-bleach solution. Scrub coop crevices using a toothbrush, and dust the coop (and your chickens!) with food-grade diatomaceous earth. Give your chickens a tub with fine dirt or dust sprinkled with some of the DE so they can self-treat with therapeutic dust baths. In the case of a severe infestation, a vet may need to prescribe a medication, such as oral ivermectin.


3. Rodents
Mice and rats like to visit chicken coops and help themselves to the food. Lured by chicken feed, scratch and other chicken treats, rodents will leave their droppings behind and contribute to unsanitary conditions in your coop. They might even bring mites along, which can infest your chickens.
Treatment: Rodents are most active at night, so remove scratch and pelleted food in the evening and put it back in the morning. Surround your coop with tight wire mesh, attached to the frame, so mice and rats cannot squeeze through. If you already have chicken wire on your coop, reinforce it by putting the smaller mesh overtop.


4. Flies
House and stable flies are the most common fly pests to invade your coop. Attracted by fresh feces, they can cause terrible damage to chickens with open sores, so chickens that are being bullied and have missing feathers and wounds are most susceptible. Some flies even lay eggs on chicken’s vents if the chicken has diarrhea.
Treatment: It’s easy to keep flies at bay by cleaning your coop regularly and changing the bedding often. Monitor the health of your chickens, and intervene if one or more chickens are being pecked at repeatedly. Watch for chronic diarrhea, and treat with the help of a poultry vet. Practice natural fly control on your property by eliminating damp areas where flies breed, and by using sticky fly traps near the coop.


5. Ants
If you like to give your chickens fresh food, you’ve probably discovered ants in your coop. These busy scavengers are experts at locating fresh produce, no matter where it is. Ants are also drawn to broken eggs, and will swarm a coop not long after an egg breaks. While ants can’t harm a healthy chicken, young chicks or sick or injured birds can become victims of biting ants.
Treatment: To prevent ants, remove uneaten fresh food after the chickens walk away from it and clean up any broken eggs right away. If you find ants swarming in your coop, spray them with an all-natural kitchen cleanser or a 1-to-1 vinegar-water solution. This will kill the ants without harming your birds.


6. Predators
The deadliest pests to invade a coop, predators can decimate a flock. If domestic dogs and cats, coyotes, raccoons, or even bobcats find their way into your coop, your chickens can be seriously injured or killed.
Treatment: The best way to keep predators out of your coop is to ensure it’s secure. The coop’s mesh wire should be no larger than 1-by-1-inch and should be securely fasted to a wood or metal frame. Dogs and coyotes will try to dig under the coop to gain access, so a cement or attached wooden floor is essential to keep your flock safe. You can also bury mesh or wood to deter digging predators, but it needs to be at least 1 foot deep. Raccoons are dexterous and will open latches. Make sure doors are raccoon-safe by using a carabineer to secure them.


About the Author: Audrey Pavia is a frequent contributor to Hobby Farms magazine. She keeps a flock of bantam chickens at her home in Norco, Calif.

Monday, October 27, 2014

Kitten Carrier

Hooby Groovy Kitten Carrier


The Hooby Groovy Kitten Carrier is hand-crafted specially for curious kittens who love cosy little cubby holes. Kittens can easily get used to travelling if they're feeling safe and comfy in their carrier. 
The Hooby Groovy Kitten Carrier is designed as a comfy kitty cubby box that's cosy and pretty enough to use at home as their regular bed.


Features:

  • Door flap is secured shut with a magnet on the top of the box to ensure your little kitty is safe and secure during travel. 
  • 11 peekaboo fly-screen windows so that kitty can still look out and satisfy their little kitty curiousity while the fly-screen ensures that they won't be able to escape out of their carrier if that noisy bird outside is just a little too enticing!
  • Personalised tag with your kitty's name embroidered on it so they know that this is their carrier. Be sure to leave me a note during checkout to let me know what your kitty's name is!
  • Trimming pictured above is brown, however I can also create the carrier with other trimming colours, just choose the trimming colour you would like in the drop down box above. 
  • Carrier can be dismantled into 3 major pieces so that it can be shipped and stored flat to save space. Putting it together is a simple matter of clipping the pieces together with the snap fasteners attached.
  • Straps are made of felt and heavy duty belting. 
  • Carrier is made of a wooden frame is that wrapped in high quality 2mm thick felt, ensuring a strong structure while still having an interesting and comfy texture that your kitty will love. 

Dimensions: 40cm x 30cm x 30cm / 15.75in x 11.8in x 11.8in
Weight: 2.36kg / 5.2 lb
 *The Hooby Groovy Kitten Carrier is made to order, creation time may take up to 4 weeks from time of payment.
 
*The pillow pictured above is not included with the Kitten Carrier. Hooby Groovy pet pillows will be available in the near future.

Shipping within Australia is via regular Australia Post parcel mail, delivery is within 3-4 business days and tracking is included.
 
Shipping to destinations outside of Australia is via Australia Post Express Post International, delivery is within 3-7 business days and tracking is included.
http://www.hoobygroovy.com/collections/hooby-groovy-for-pets/products/hooby-groovy-kitten-carrier
.. 

Sunday, October 26, 2014

Dog Agility: A Sport for You and Your Pup


Dog Agility Is A Sport 

If you’re ready for a new challenge, consider giving dog agility a try. Although the training for agility requires time and patience, the sport offers obedience, social skills, and fitness benefits for dogs and is enjoyable for people as well.

Sara Woolverton, handler of 5-year-old Scout (pictured), has been competing for two and a half years and says the commitment is well worth the benefits. “Scout and I both love it. You can tell from her face she has a good time.

To get involved, start with a basic
understanding of dog agility and a positive attitude

What Is Dog Agility?

Dog agility is a sport in which dogs navigate their way through a variety of obstacles led by their handlers’ directions. “The dog knows everything he needs to know within the first one to two years,” Woolverton says. “After that, it’s all about the person. The art of it is in the person communicating to the dog what it is he needs to do.” Since agility competitions prohibit food or toy incentives, dogs rely only on their handlers’ vocal and motion cues to direct them through obstacle courses.
.


Benefits of Dog Agility


Agility training cultivates a strong bond between handlers and dogs, since dogs must follow their handlers' instructions carefully through courses. But the physical aspect of the sport is also a positive reason to participate. Training for obstacle courses is a great way to keep dogs physically fit. Agility also offers an opportunity for both owners and dogs to spend more time outside.


The Social Advantage

Agility can also improve dogs’ social skills since both competitions and training classes facilitate friendships. Woolverton says that Scout and her friend Sophie, a blue border collie, met in class a year ago and are now inseparable. Woolverton has also seen a change in Scout’s personality since she began agility. “She’s always been on the shy side,” says Woolverton. “She’s a retriever who doesn’t like to retrieve. But doing agility has made her more active and approachable.” Agility allows dogs to gain confidence, which will make them more comfortable in social settings.


Understanding the Basics

If agility sounds like the sport for you and your dog, it’s time to get started. First, Woolverton suggests that dogs complete a basic obedience class. After you have built a relationship with your dog in obedience class, enroll in agility classes. But Woolverton warns that agility classes can fill up fast. “It can take a while. But if you find one you want, it’s worth waiting for,” she says. Plan ahead by joining the waiting list for agility while completing the obedience class. In agility classes, dogs will learn a variety of tricks that they can perform in competitions.

  Jumps

Jumps are one of the basic obstacles dogs will learn in agility classes. The height of the bar depends on the dog’s ability and size. Learning jumps is a gradual process, according to Woolverton. Dogs will start by simply walking over a pole lying flat on the ground, and handlers will raise the pole height gradually, making sure the dog is comfortable at each height before moving up. Although dogs may be persuaded with treats or toys in training, handlers will be disqualified for using any incentives during course runs in competitions.


Tunnels
Tunnels

Dogs also learn tunnels in agility class. Similar to the way they learn jumps, dogs will learn how to master tunnels by slowly increasing the difficulty. Dogs first learn how to walk through a hula hoop, then a foot-long tunnel, and eventually the large ones used in competitions. Tunnels are Scout’s favorite obstacle. “Even if it’s not where she is supposed to go, if it’s right ahead or nearby, she will go through it anyway because she enjoys them so much,” Woolverton says.


 Competitions

After your dog has mastered training and you feel comfortable directing her through obstacles, it’s time to sign up for your first competition. During competitions, dogs are judged on speed, accuracy and ability. Competitions are held all day for multiple days. Woolverton warns that during warmer months the events are hot and tiring for both handler and dog. She suggests purchasing a shaded carrier and keeping water bottles close for both human and dog hydration.


Advanced Agility

With continuous improvement, your dog can qualify for the advanced level at competitions. Woolverton says that handlers should be aware of tricky obstacle sequences at this level. “For instance, they will put something out that looks really attractive to the dog, like a tunnel,” says Woolverton. “But the handler has to get the dog to go in a different direction and take something else.” To prepare for higher level courses, handlers should devote practice time to improving their directions and train dogs to run obstacles in a complicated order.


One Rule to Remember


No matter what level of competition you're in, keep the sport enjoyable by avoiding an aggressive attitude. Focusing too much on winning is bound to change agility from a fun activity to a frustrating chore. During competitions try to focus on improvement instead of winning, and enjoy yourself. “It allows you to let go,” says Woolverton. “Getting first place is great, but it’s really about if we had a good time. If it’s not fun, it’s not healthy, and your dog will run better if you’re both having fun.”


By Sonja Bistranin, eHow
Photo courtesy of Sara Woolverton

Read more : http://www.ehow.com/slideshow_12327807_dog-agility-sport-pup.html#slide=1


zzzzzzzzzzzzzzzz

Saturday, October 25, 2014

Antique Egg Carrier

Antique Egg Carrier from the early 1900's
Carrier is Approx. 13" x 13" x 11" Tall

Carrier is constructed of wood with a sliding top and carry handle. 
Original cardboard egg dividers fill the carrier with the ability to hold 36 eggs on each layer

Most of the 36 artificial eggs in the first level are made of wood
with a few plastic exceptions

This carrier is in beautiful, excellent, clean condition from TWIN BROOK FARMS, GARLAND, MAINE

A must have display piece for the Chicken enthusiast.


$86.50 plus shipping to locations within the continental USA.


..

The 4 Musts About Chicken Perches


Where And How Do You Put Perches in Chicken Coops?

By Cody Sorensen, eHow Contributor

Perches allow chickens a healthier sleeping environment.

Chickens need perches in their coop to allow them to sleep without standing in their feces. Chickens roost on perches in the wild to avoid predators at night and during the day. Perches in a chicken coop help fulfill this natural tendency. 

Well-placed perches help keep chickens from pooping on each other and from getting injured. Chickens need to have perches that provide enough surface area for them to balance on while sleeping. Placement, spacing, length and height are the four things to consider during the installation process. 


Placement

The perches need to be placed toward the back of the coop away from nesting boxes, windows and doors. This placement will ensure the chickens stay out of harmful drafts and out of the nesting boxes at night. 


The perches need to be secured to the walls of the coop and installed level. A bubble level can help you accomplish this. Un-level perches cause chickens to fatigue one leg more than the other. This can result in chickens falling off the roosts at night.


Spacing

Chickens need space to accommodate the varied temperaments in a flock. Some chickens don't mind roosting shoulder to shoulder, but others won't allow any neighbors within 12 to 24 inches. 


Install the perches so that each roost is 12 inches apart. This will help keep the more aggressive birds from pecking at the less aggressive ones above or below them. 

Stagger each perch 12 inches up or 12 inches below subsequent perches. 

Offset the perches by 12 inches so you don't have any perches directly on top of each other.


Length

Count the number of chickens you have in your flock and then multiply that number by 1 foot. Each chicken needs a minimum of 1 foot on the perch. If you have 12 chickens, you need to install 12 feet of perch space. 


The length and amount of perches you need to install depends on the width and design of your chicken coop. If your coop is 3 feet wide, you'll need four 3-foot long perches to accommodate 12 chickens. Always provide more than the minimum to keep your chickens comfortable.


Height

Never set roosts higher than 4 feet off the ground. When you place them higher than this, the risk of injury increases. 


Chickens can get rather feisty when they begin roosting in the evening. Chickens have a pecking order and the dominant birds always goes for the top perch. This process often causes some of the submissive birds to fall off the roosts. 

A fall from a roost higher than 4 feet can cause foot, leg and wing injuries. Always keep a 6- to 8-inch layer of pine shavings on the floor to help cushion falling chickens.

Read more : http://www.ehow.com/info_8148099_do-put-perches-chicken-coops.html


How to Build a Chicken Roost or Roosting Rod

Roosting rods should easily support the weight of several chickens.

Chickens instinctively spend the night off the ground, making a roost an essential feature for any chicken coop. The simplest kind is a horizontal rod or pole suspended above the ground or floor. 


Materials for roosting rods can range from wood dowels to tree branches, but they must be suitable for a chicken's feet to grasp comfortably, yet sturdy enough to support the weight of several birds. 


One of the easiest materials to use is standard 2-by-2 lumber, which is milled with slightly rounded edges. A roosting rod supported by notched supports, or cleats, makes it easy to remove for cleaning the coop or replacing the rod.


Plan the Roosting Rod Location

1   Determine the number of roosting rods you’ll need based on the maximum number of chickens living in the coop. Provide at least 8 inches of roosting space per chicken.


2   Plan the height of each roosting rod. While some commercial freestanding roosts can be only about 6 inches tall, chickens prefer to be higher off the ground. You can place them as high as you like; just make sure the rods are at least 12 inches off the ground and that the birds have plenty of headroom while roosting.


3   Arrange the locations of multiple rods for adequate space, leaving 18 inches between side-by-side perches. You can also arrange rods diagonally (at an ascending angle), leaving at least 12 inches of horizontal and vertical space between neighboring rods. 


Do not position rods directly above one another, as the lower perches would be in the line of fire from droppings.

4   Mark the rod locations onto the coop’s walls. Rods can extend between any two opposing walls or other supports, or can run diagonally between adjacent walls.


Cut the Rods and Cleats

5   Cut 5-inch lengths of 2-by-4 for the ends of each rod, using a circular saw, miter saw, or handsaw. These are the cleats that will hold the ends of the rods.


6   Cut each rod to length from a 2-by-2 so it fits easily between the supporting walls of the coop at the marked locations. If the rods will sit diagonally, cut their ends at opposing 45-degree angles.


7   Sand all surfaces of each rod with 100-grit sandpaper to remove any sharpness and splinters.


8   Mark and cut a 1-1/2-inch-wide by 1-1/2-inch-deep notch into the top edge of each cleat, to accept the ends of the rods. Cut the notches by making multiple parallel cuts with a saw, then chiseling out the waste pieces and cleaning up the bottoms of the notches with a wood chisel. For diagonal rods, make the notches at a 45-degree angle across the top edges of the cleats.


9   Drill four pilot holes through each cleat, spacing a pair of holes evenly at either side of the notched center area. Use a drill and countersink-piloting bit to create a recess for screw heads.


Install the Rods


10   Position a cleat on its mark on the supporting wall, with the notched edge pointing up. Use a torpedo level to make sure the top edge of the cleat is level.


11   Fasten the cleat to the coop wall with four deck screws. The screws' length should be 1-1/2 inches plus about 3/4 of the thickness of the coop wall (or support) material.


12   Position a second cleat on the opposing support wall. Set one of the rods into the notches of both cleats and make sure it is level, then fasten the second cleat as with the first. Repeat the process to install  the remaining cleats and rods.


Read more : http://www.ehow.com/how_5153405_build-chicken-roost-roosting-rod.html


..