Where And How Do You Put Perches in Chicken Coops?
By Cody Sorensen, eHow Contributor
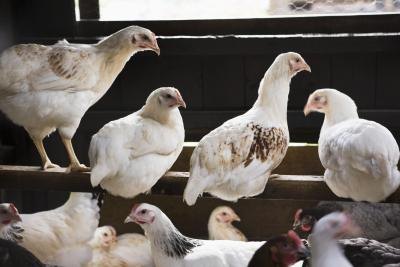
Perches allow chickens a healthier sleeping environment.
Chickens need perches in their coop to allow them to sleep without standing in their feces. Chickens roost on perches in the wild to avoid predators at night and during the day. Perches in a chicken coop help fulfill this natural tendency.
Well-placed perches help keep chickens from pooping on each other and from getting injured. Chickens need to have perches that provide enough surface area for them to balance on while sleeping. Placement, spacing, length and height are the four things to consider during the installation process.

Placement
The perches need to be placed toward the back of the coop away from nesting boxes, windows and doors. This placement will ensure the chickens stay out of harmful drafts and out of the nesting boxes at night.
The perches need to be secured to the walls of the coop and installed level. A bubble level can help you accomplish this. Un-level perches cause chickens to fatigue one leg more than the other. This can result in chickens falling off the roosts at night.
Spacing
Chickens need space to accommodate the varied temperaments in a flock. Some chickens don't mind roosting shoulder to shoulder, but others won't allow any neighbors within 12 to 24 inches.
Install the perches so that each roost is 12 inches apart. This will help keep the more aggressive birds from pecking at the less aggressive ones above or below them.
Stagger each perch 12 inches up or 12 inches below subsequent perches.
Offset the perches by 12 inches so you don't have any perches directly on top of each other.
Length
Count the number of chickens you have in your flock and then multiply that number by 1 foot. Each chicken needs a minimum of 1 foot on the perch. If you have 12 chickens, you need to install 12 feet of perch space.
The length and amount of perches you need to install depends on the width and design of your chicken coop. If your coop is 3 feet wide, you'll need four 3-foot long perches to accommodate 12 chickens. Always provide more than the minimum to keep your chickens comfortable.
Height
Never set roosts higher than 4 feet off the ground. When you place them higher than this, the risk of injury increases.
Chickens can get rather feisty when they begin roosting in the evening. Chickens have a pecking order and the dominant birds always goes for the top perch. This process often causes some of the submissive birds to fall off the roosts.
A fall from a roost higher than 4 feet can cause foot, leg and wing injuries. Always keep a 6- to 8-inch layer of pine shavings on the floor to help cushion falling chickens.
Read more : http://www.ehow.com/info_8148099_do-put-perches-chicken-coops.html
How to Build a Chicken Roost or Roosting Rod
Roosting rods should easily support the weight of several chickens.
Chickens instinctively spend the night off the ground, making a roost an essential feature for any chicken coop. The simplest kind is a horizontal rod or pole suspended above the ground or floor.
Materials for roosting rods can range from wood dowels to tree branches, but they must be suitable for a chicken's feet to grasp comfortably, yet sturdy enough to support the weight of several birds.
One of the easiest materials to use is standard 2-by-2 lumber, which is milled with slightly rounded edges. A roosting rod supported by notched supports, or cleats, makes it easy to remove for cleaning the coop or replacing the rod.
Plan the Roosting Rod Location
1 Determine the number of roosting rods you’ll need based on the maximum number of chickens living in the coop. Provide at least 8 inches of roosting space per chicken.
2 Plan the height of each roosting rod. While some commercial freestanding roosts can be only about 6 inches tall, chickens prefer to be higher off the ground. You can place them as high as you like; just make sure the rods are at least 12 inches off the ground and that the birds have plenty of headroom while roosting.
3 Arrange the locations of multiple rods for adequate space, leaving 18 inches between side-by-side perches. You can also arrange rods diagonally (at an ascending angle), leaving at least 12 inches of horizontal and vertical space between neighboring rods.
Do not position rods directly above one another, as the lower perches would be in the line of fire from droppings.
4 Mark the rod locations onto the coop’s walls. Rods can extend between any two opposing walls or other supports, or can run diagonally between adjacent walls.
Cut the Rods and Cleats
5 Cut 5-inch lengths of 2-by-4 for the ends of each rod, using a circular saw, miter saw, or handsaw. These are the cleats that will hold the ends of the rods.
6 Cut each rod to length from a 2-by-2 so it fits easily between the supporting walls of the coop at the marked locations. If the rods will sit diagonally, cut their ends at opposing 45-degree angles.
7 Sand all surfaces of each rod with 100-grit sandpaper to remove any sharpness and splinters.
8 Mark and cut a 1-1/2-inch-wide by 1-1/2-inch-deep notch into the top edge of each cleat, to accept the ends of the rods. Cut the notches by making multiple parallel cuts with a saw, then chiseling out the waste pieces and cleaning up the bottoms of the notches with a wood chisel. For diagonal rods, make the notches at a 45-degree angle across the top edges of the cleats.
9 Drill four pilot holes through each cleat, spacing a pair of holes evenly at either side of the notched center area. Use a drill and countersink-piloting bit to create a recess for screw heads.
Install the Rods
10 Position a cleat on its mark on the supporting wall, with the notched edge pointing up. Use a torpedo level to make sure the top edge of the cleat is level.
11 Fasten the cleat to the coop wall with four deck screws. The screws' length should be 1-1/2 inches plus about 3/4 of the thickness of the coop wall (or support) material.
12 Position a second cleat on the opposing support wall. Set one of the rods into the notches of both cleats and make sure it is level, then fasten the second cleat as with the first. Repeat the process to install the remaining cleats and rods.
Read more : http://www.ehow.com/how_5153405_build-chicken-roost-roosting-rod.html
..
Also...using a 2 x 4 wide side horizontal is good in the winter, so their feet won't get frostbitten.
ReplyDelete